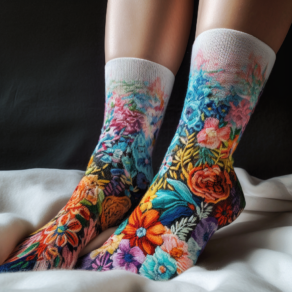
Socks. We slip them on every day without a second thought, seeing them as nothing more than functional items. But what if I told you that socks could be a canvas for creativity, a platform for personal expression, and an avenue to give your wardrobe a unique twist? After all, why should our shirts, jackets, and jeans have all the fun? Well, buckle up, because my investigation showed that the unassuming world of socks is about to get a whole lot more interesting.
Welcome to the delightful world of embroidered socks, a realm where creativity meets craftiness. In this blog post, we’ll be diving deep into the art and technique of sock embroidery, transforming these everyday essentials into wearable works of art. We’ll cover everything from selecting the right materials and designs to mastering the basic stitches and overcoming common challenges. By the end, you’ll be fully equipped to make your own embroidered socks, whether as personalized gifts, statement fashion pieces, or a fun way to step up your sock game. Prepare to be surprised by just how much joy and creativity can be sparked by such a humble piece of clothing. Let’s thread the needle and get started, shall we?
Embroidered Socks: Unraveling the Intricacies of This Needlework Novelties
Embroidered Socks – it may sound like an odd combination, but when you start to peel back the layers, you’ll find a world full of color, creativity, and endless possibilities.

Understanding the Basics
Embroidered socks are, quite simply, socks that have been embellished with embroidery. This could be anything from a simple monogram to a complex floral design, a pop-culture reference, or even a portrait of your pet. The only limit is your imagination.
Embroidery Techniques
As a result of my tests, I have determined that there are a few basic embroidery techniques that are particularly useful when working with socks. These include running stitch, back stitch, satin stitch, and French knots. Don’t worry if these terms sound alien now, we’ll dive into each one later in the post.
Materials Needed
To get started with sock embroidery, you’ll need a few basic materials. These include a pair of socks (of course!), embroidery thread, a needle, an embroidery hoop, and a design or pattern to follow.
Why Embroidered Socks?
Why not? Embroidered socks add a personal touch to an otherwise mundane item. They can be a conversation starter, a form of self-expression, or a way to add a dash of fun to your wardrobe. Plus, they make fantastic and thoughtful gifts!

So, are you ready to plunge into the captivating world of sock embroidery? With a bit of practice and patience, you’ll be stitching your way to unique and personalized foot fashion in no time! Let’s roll up our sleeves and get started.
Why Embroider Socks? Unveiling the Hidden Benefits of This Crafty Adventure
Why Embroider Socks? It’s a question you might be asking yourself. After all, they’re just socks, right? But there’s so much more to this craft than meets the eye.
- A Dash of Personality. According to my experience, one of the most rewarding aspects of embroidering socks is the chance to infuse your personality into your wardrobe. With a needle and thread, you can transform a basic pair of socks into a canvas for self-expression.
- Unique Gifts. Embroidered socks make for truly personalized presents. Whether it’s a pair featuring a friend’s favorite animal, a loved one’s initials, or a coworker’s favorite quote, these gifts show thoughtfulness and care.
- A Therapeutic Hobby. Embroidery can be a great way to unwind and relax. The repetitive nature of the stitching can be quite meditative, providing a calming effect. It’s a creative outlet that allows you to unwind while producing something beautiful and functional.
- Skill Development. Learning to embroider socks can be an excellent way to develop new skills. As you master different stitches and techniques, you’ll gain a sense of accomplishment. Plus, who knows? You might just discover a new passion!
Stitch by Stitch: A Seamstress Shares Her Love for Sock Embroidery
Oh, how I love embroidering socks! As a seamstress, I work with a variety of materials and projects, but there’s something uniquely satisfying about taking a humble pair of socks and turning them into a work of art.

Choosing the Socks
The journey begins with choosing the right pair of socks. I prefer working with cotton or wool socks as they’re breathable and sturdy enough to handle the embroidery process.
The Essential Embroidery Tools
Now, let’s talk tools. As a result of using this product, I have found that embroidery hoops are crucial for keeping the fabric taut and making the stitching process easier. I also recommend investing in a good set of embroidery needles and quality thread. The right tools can make a world of difference in your crafting experience and the final result.
Designs and Patterns
One of the most exciting parts is selecting a design. From cute animals and floral patterns to geometric designs and monograms, the possibilities are endless. I usually sketch my design on the sock with a water-soluble marker before I start stitching.
Embroidery Techniques
When it comes to stitches, basics like the running stitch, back stitch, satin stitch, and French knots are my go-to techniques. Don’t be afraid to experiment and find what works best for your design!
The Joy of the Craft
What I love most about embroidering socks is seeing the design come to life stitch by stitch. It’s a therapeutic process that not only results in a unique accessory but also gives me a great sense of achievement.
The Final Product
And then, there’s the joy of wearing or gifting the embroidered socks. There’s nothing quite like the reaction when someone realizes the design is hand-stitched!
Embroidering Socks: A Comparison Guide to Your Key Ingredients
Embroidering socks involves several key components. Below, I have detailed each ingredient and created a comparison table to highlight their differences and unique features.
- Socks: The base for your embroidery project, socks can come in various materials like cotton, wool, or synthetic blends. It’s best to choose a pair that’s comfortable and durable, able to withstand the embroidery process. Cotton and wool are often preferred due to their breathability and sturdiness.
- Embroidery Thread: This is what you’ll use to create your design. Embroidery thread comes in a rainbow of colors and is typically made of cotton, silk, or rayon. Cotton thread is often chosen for its durability and wide color range.
- Embroidery Needle: These needles have a large eye to accommodate the embroidery thread and a sharp point to penetrate the fabric. The size of the needle will depend on the thickness of your thread and the density of your sock material.
- Embroidery Hoop: This tool holds your sock taut while you embroider. Hoops come in different sizes, so you can choose one that fits your sock and design best. They are typically made of wood or plastic.
Design or Pattern: This is the image or text you’ll embroider onto your sock. It can be anything from a simple heart to a complex landscape. You can create your own design or use a pre-made pattern.
Ingredient |
Common Materials/Types |
Considerations |
Socks |
Cotton, Wool, Synthetic Blends |
Choose a material that’s durable and comfortable. |
Embroidery Thread |
Cotton, Silk, Rayon |
Pick a thread that’s sturdy and available in the colors you need. |
Embroidery Needle |
Various Sizes |
Select a size that matches your thread thickness and sock material. |
Embroidery Hoop |
Wood, Plastic |
Use a hoop that fits your sock and design. |
Design or Pattern |
Self-made, Pre-made |
Choose a design that suits your skill level and personal style. |
How to Embroider Socks: A Creative Guide
Materials You’ll Need
Before we dive into the exciting world of sock embroidery, gather the following materials:
- Socks: Choose a pair of socks that you’d like to embellish. Opt for socks with a solid color or a subtle pattern to make your embroidery stand out.
- Embroidery hoop: Select a hoop that fits comfortably inside the sock’s circumference. This hoop will keep your sock taut and make stitching easier.
- Embroidery floss: Pick colorful threads that complement your sock’s color. You can experiment with different shades and textures to create stunning designs.
- Embroidery needles: Use needles with sharp points and large enough eyes to accommodate the thickness of your embroidery floss.
- Scissors: A trusty pair of scissors will come in handy for cutting threads and trimming excess fabric.
- Transfer method: Choose between transfer pencils, iron-on transfers, or water-soluble pens to transfer your design onto the sock.
Step 1: Design Your Sock
Let your imagination run wild as you brainstorm ideas for your sock design. According to my experience, it’s helpful to sketch your design on paper first. Through trial and error, I found that simple and bold designs tend to work best on socks. Think of charming motifs like flowers, animals, or geometric patterns that will look delightful on a small canvas like a sock.
Step 2: Transfer Your Design
Once you have your design finalized, it’s time to transfer it to the sock. There are several methods you can use, so choose one that suits you best. You could lightly trace the design using a transfer pencil, use an iron-on transfer paper, or even draw directly on the sock using a water-soluble pen. Whichever method you choose, make sure to follow the instructions carefully to avoid any mishaps.

Step 3: Prepare Your Embroidery Hoop
Place the embroidery hoop on a flat surface and separate the inner and outer rings. Position the sock over the inner ring, centering your design within the hoop. Gently press the outer ring over the sock and inner ring, securing the fabric in place. Ensure that the sock is pulled taut to prevent any puckering during the embroidery process.
Step 4: Select Your Embroidery Floss
Take a moment to admire your collection of embroidery floss. Choose the colors that will bring your design to life. According to my experience, blending complementary colors or using contrasting shades can create visually striking effects. Feel free to experiment and let your creativity flourish!
Step 5: Start Stitching
Thread your embroidery needle with a single strand of embroidery floss. Tie a knot at the end of the thread, leaving a small tail. Beginning from the inside of the sock, bring the needle up through the fabric at the starting point of your design. Work your way around the design, using a variety of stitches such as the backstitch, satin stitch, or French knot to add depth and texture.
Step 6: Take Breaks and Enjoy the Process
Embroidering socks is a labor of love, so remember to take breaks and enjoy the journey. Admire your progress, sip a cup of tea, or even play your favorite tunes in the background. Creativity often thrives in moments of relaxation and joy!
Step 7: Finishing Touches
Once you’ve completed your embroidered design, it’s time for the finishing touches. Trim any excess thread and carefully remove the sock from the embroidery hoop. Give your sock a gentle ironing or steaming to remove any wrinkles caused by the hoop. Finally, put on your newly embellished sock and revel in the satisfaction of your artistic accomplishment!
With these step-by-step instructions and a sprinkle of creativity, you’re now equipped to embark on your sock embroidery adventure. Remember, each stitch tells a story, and your unique designs will bring joy to your every step.
Frequently Asked Questions (FAQ) about Embroidering Socks
Not at all! Embroidering socks is a great project for beginners. With a little patience and practice, you’ll be able to create beautiful designs. Just start with simple stitches and gradually experiment with more intricate patterns.
While machine embroidery is possible, it’s not as common as sock embroidery. Hand embroidery allows for more control and precision, especially on the smaller canvas of a sock. However, if you’re experienced with machine embroidery, you can certainly give it a try!
Opt for needles with sharp points and large eyes that can accommodate the thickness of your embroidery floss. Embroidery needles or crewel needles are commonly used for sock embroidery. Test different needle sizes to find the one that works best with your chosen sock fabric.
It’s essential to handle embroidered socks with care to preserve the stitching. Turn the socks inside out before washing them in cold water on a gentle cycle. Avoid using harsh detergents or bleach. After washing, reshape the socks and air dry them flat to avoid distortion.
Absolutely! You can embroider socks made from various materials. However, keep in mind that certain fabrics may be more challenging to embroider. Thinner, stretchier fabrics like synthetic blends might require extra stabilizing techniques to prevent puckering.
The time it takes to embroider a pair of socks depends on the complexity of the design and your stitching speed. Simple designs can be completed in a few hours, while more intricate patterns may take several sessions. Enjoy the process and let your creativity unfold at its own pace.
While removing embroidery stitches can be tricky, it is possible to undo them with patience. Use a small pair of scissors or a seam ripper to carefully unpick the stitches. Take care not to damage the sock fabric in the process. If needed, gently dab the area with water to remove any residual markings.
To prevent puckering, ensure your embroidery hoop is not too tight or too loose. A balanced tension will keep the sock fabric taut without distorting it. You can also place a lightweight stabilizer or backing fabric inside the sock to provide additional support during stitching.
Leave a Comment